Thursday, May 28, 2009

Get a Free 7.5 x 5.5 Soft Cover Photo Book

Have you ever wanted to try digital scrapbooking, but were afraid? Well, now is the time. For a limited time, you can get a FREE* 20 page 7.5 x 5.5 Soft Cover Photo Book. You pay for the shipping and handling (under $5 for economy shipping) and for any extra pages you want to add to the book. The book comes with 20 pages, but you can add pages for 25 cents per page up to a maximum of 100 pages.


Instructions for Getting Your Free Book Code:
Step one - Visit www.photobookoffer.com
Step two - Enter access code: CS0509
Step three - Click the Submit Button
Step four - Visit www.celestialscrapbooks.com and use code at checkout


*Does not include shipping and handling fee of $4.95. Free book includes 20 pages; additional pages available at extra cost.


The program is simple to use, fast and fun. You don't have to upload your photos because you use them right off of your computer. All you need is Internet access with Internet Explorer and you can start creating photobooks, calendars, mugs, shirts, luggage tags and much more! If you would like more information visit Celestial Scrapbooks - there are tutorial videos and you can compare our products to our major competitors.

Friday, May 22, 2009

Heidi Swapp Invisibles


Heidi Swapp Invisibles allow you to make a truly unique page! Each sheet of cardstock has a pattern on it with a resist material that allows you to use ink, chalk or glimmer mist to create your own special pattern. The areas without the resist material accept the color, but the resist areas do not accept the color and the pattern comes through.

Tips for Using the Mask

  • De-stick it a little by dabbing on your clothes to remove some of the sticky.
  • Layer with the positive and negative shapes
  • Lay the mask sheet face down on the work surface then lay the Invisible face down on top of it – it is much easier to get the shapes straight if you do it this way rather than juggling with a floppy, sticky piece of plastic! Turn over and smooth the mask in place.
  • Use a blending pad to apply ink or chalk
  • Clean the mask after use so the next time you use it the previous color doesn’t come off onto your new project.
  • Use scrap paper if you are near the edge of the page – that way you can keep on inking without worrying about getting it on the table.

What can you use?

  • Acrylic paints (go easy so the paper doesn’t get too wet!)
  • Chalks
  • Glimmer mists
  • Inks

Care of the Mask

Always store the mask on its backing sheet when not in use, and take care to clean off any ink after use. If it loses its “stick” after a few uses, wash it gently in warm soapy water and allow it to air dry and it will be as good as new again, a spray removable adhesive could also be used.


Create your own masks!

You can create your own masks with almost anything - die cuts or chipboard comes to mind. They are a great way to make your own masks without spending a lot of money. Just remember to use repositionable tape!!


Tuesday, May 12, 2009

Tips on Taking Portraits

Scrapbookers use photographs alot, so you want to have photographs that really tell a story and will enhance your scrapbook page. Trying to find new angles or changing your perspective is something that I have talked about before but I recently came across this blog post by Darren Rowse of Digitial Photography School. He has some really great ideas for taking more interesting portaits. Check out his blog post called 10 Ways to Take Stunning Portraits.

Saturday, May 9, 2009

Acrylic Dogbone Album


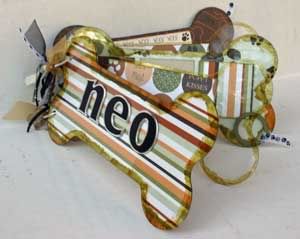
Acrylic albums are clearly a lot of fun! The clear pages give you lots of options because you can completely cover them with paper or you can use them clear so that you can see-thru to the next page. In this album, I did a little of both! I'll walk you through the steps I took to create this acrylic dogbone album.

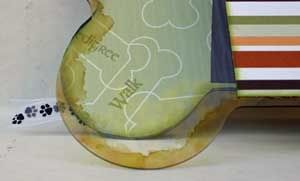
First up...ink the edges. Alcohol ink works great on acrylic and you can mix the colors to get just the right effect. I inked the edges of all five pages of the album even though I was covering some of the pages with cardstock. You can use the inked edges to "hide" gluedots and when the paper doesn't line up perfectly....not that that ever happens to me! ;).

Here is a close-up of the inked edge:


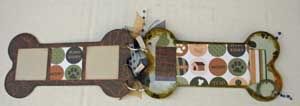
Now, there is a little planning involved in what you want to do next - all covered, all clear or mix-n-match. I decided to do every other page covered, so the cover, 3rd and last pages were covered with cardstock. Double-sided cardstock works great on this type of project because you can see both sides. Lay the shaped album on the cardstock and trace around it, then use scissors to cut a little to the inside of the line. Once you have the first cut, line up the cardstock with the album page and make some adjustment cuts as needed! Believe me you never get it right the first time and there are always some minor cuts that need to be done. Next, adhere the cardstock with small glue dots along the edge of the shape, which will be hidden by the inked edge.

When you do clear pages you need to plan ahead a little because you can see through to the pages behind them. For one of the pages that I left clear, I cut out two photo mats the same size and glued them on back to back. Then on the page behind the clear page I used the same size photo mat so when the clear page is on top, you can't see the photomat of the page behind it. Clear as mud right?! Hopefully this example below will make it a little clearer.


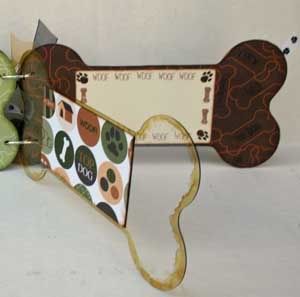
The other option for clear pages are to have something from the page behind "peek" out when the clear page is on top. See the example below where I used a rectangle sized photomat on the clear page and three square photomats on the cardstock page so two parts of the squares show through.


The last step is to add some embellishments and use various ribbons and fibers to help hide the metal ring that keeps the book together. Tada....You're done!

Also check out the Top 10 Ways to Alter Acrylic.


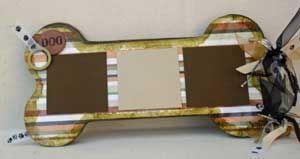
This book is dedicated to our good friend Neo the German Shepherd - you will be missed.