
Scrapbookers use photographs alot, so you want to have photographs that really tell a story and will enhance your scrapbook page. Trying to find new angles or changing your perspective is something that I have talked about before but I recently came across this blog post by Darren Rowse of Digitial Photography School. He has some really great ideas for taking more interesting portaits. Check out his blog post called 10 Ways to Take Stunning Portraits.
Tuesday, May 12, 2009


Saturday, May 9, 2009
Acrylic Dogbone Album
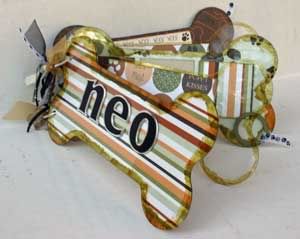
Acrylic albums are clearly a lot of fun! The clear pages give you lots of options because you can completely cover them with paper or you can use them clear so that you can see-thru to the next page. In this album, I did a little of both! I'll walk you through the steps I took to create this acrylic dogbone album.
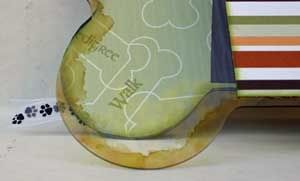
First up...ink the edges. Alcohol ink works great on acrylic and you can mix the colors to get just the right effect. I inked the edges of all five pages of the album even though I was covering some of the pages with cardstock. You can use the inked edges to "hide" gluedots and when the paper doesn't line up perfectly....not that that ever happens to me! ;).
Here is a close-up of the inked edge:
Now, there is a little planning involved in what you want to do next - all covered, all clear or mix-n-match. I decided to do every other page covered, so the cover, 3rd and last pages were covered with cardstock. Double-sided cardstock works great on this type of project because you can see both sides. Lay the shaped album on the cardstock and trace around it, then use scissors to cut a little to the inside of the line. Once you have the first cut, line up the cardstock with the album page and make some adjustment cuts as needed! Believe me you never get it right the first time and there are always some minor cuts that need to be done. Next, adhere the cardstock with small glue dots along the edge of the shape, which will be hidden by the inked edge.
When you do clear pages you need to plan ahead a little because you can see through to the pages behind them. For one of the pages that I left clear, I cut out two photo mats the same size and glued them on back to back. Then on the page behind the clear page I used the same size photo mat so when the clear page is on top, you can't see the photomat of the page behind it. Clear as mud right?! Hopefully this example below will make it a little clearer.
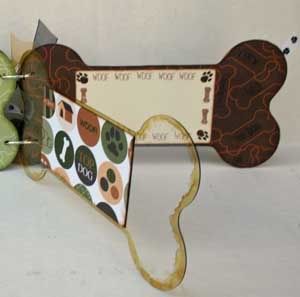
The other option for clear pages are to have something from the page behind "peek" out when the clear page is on top. See the example below where I used a rectangle sized photomat on the clear page and three square photomats on the cardstock page so two parts of the squares show through.
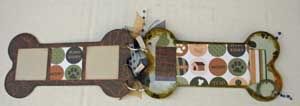
The last step is to add some embellishments and use various ribbons and fibers to help hide the metal ring that keeps the book together. Tada....You're done!
Also check out the Top 10 Ways to Alter Acrylic.
Also check out the Top 10 Ways to Alter Acrylic.
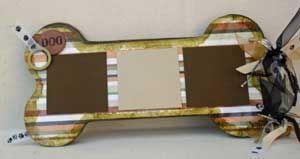
This book is dedicated to our good friend Neo the German Shepherd - you will be missed.
Thursday, April 30, 2009
Free Shipping on National Scrapbook Day Weekend
National Scrapbook Day is the first Saturday in May, so this Saturday, May 2, 2009 is National Scrapbook Day! In order to celebrate we are offering FREE SHIPPING from Friday, May 1, 2009 to Sunday, May 3, 2009. How do you get free shipping? Just three simple steps!
Step 1 - Visit Celestial Creations & Scrapbook Supplies, Inc.
Step 2 - Purchase ANY amount of product between May 1 and May 3, 2009
Step 3 - Use code NSD09 at checkout and get free shipping
If that isn't enough, everyone that purchases items from the store between May 1 and May 3, 2009 will be entered into a drawing where one (1) lucky winner will get a $50 Gift Certificate to shop for additional scrapbook supplies!
Happy Scrappin!
Step 1 - Visit Celestial Creations & Scrapbook Supplies, Inc.
Step 2 - Purchase ANY amount of product between May 1 and May 3, 2009
Step 3 - Use code NSD09 at checkout and get free shipping
If that isn't enough, everyone that purchases items from the store between May 1 and May 3, 2009 will be entered into a drawing where one (1) lucky winner will get a $50 Gift Certificate to shop for additional scrapbook supplies!
Happy Scrappin!
Sunday, April 26, 2009
Flocking
Ever want to try using flock? Have you ever heard of flocking? Flock is a fun, fluffy and fuzzy fiber that you can adhere to projects to enhance an image or a pattern on patterned paper. It can even be mixed with glitter to give it a little sparkle.
To use flock you can use a strong high-tack glue such as Aleene's Paper Glaze. Apply the glue either free-hand or by going over a stamped image or pattern. Next, place the flocking on it, apply if with a heavy hand because you shake off the excess and save it for another project. Gently pat the flocking to ensure it really gets into the glue then let it dry. After at least 15 minutes, shake off the excess flock and re-store for later. This will leave you with a flocked image.
You can also use Terrifically Tacky Tape to make a flocked straight line. Cut the length of tape that you would like and tap it into a pile of flock to cover the exposed sticky side of the tape. Next, remove the red covering that protects the other side of the tape and adhere it to your project.
Some examples of things you can flock:
You can also use Terrifically Tacky Tape to make a flocked straight line. Cut the length of tape that you would like and tap it into a pile of flock to cover the exposed sticky side of the tape. Next, remove the red covering that protects the other side of the tape and adhere it to your project.
Some examples of things you can flock:
- a stamped image such as a duck, chick, or sheep
- letters (stamped or cut-outs)
- double-sided tape to make a straight edge (alternative to using ribbon)
- directly on patterned paper to enhance the paper
- brads
- stickers
Monday, April 20, 2009
Even More Cool Ways to Use Stickles
I had posted about ways to use Stickles in a previous post and found that the link to the video no longer works, so I thought I would do an updated post on all the different ways you can use Stickles.
Tips on Working with Stickles:
Clogged tip - use a needle and push it down the opening to clear out the clog
If you are HEAVY on the stickles and you put a TON on a page - let it dry for several hours, maybe even overnight! You can use a heat gun if you are in a rush.
Not sure which color to get - start with a clear one like Icicle or Diamond, these colors will just add sparkle to whatever you are using it with and the color will show through it. Then you can go crazy with all the other colors available!
Examples:

Stickles Titles - Stickle over a stamped word

Stickles for Center of Flowers

Stickles to make an Embellishment "pop"
Need a Stickles fix?! - From April 20, 2009 through April 30, 2009 - buy 5 Stickles and get one FREE! - Use the Comments Section at checkout to state what FREE color you would like.
Stickles is a glitter glue that is manufactured by Ranger and come in tons of different colors. It has a fine tip so you can actually write with it, do fine-detailing, or you can really spread it around to cover a larger area. Stickles are the best scrapbook investment because for under $2 you can get a 0.5 ounce bottle that will last for many, many projects. Stickles is also acid-free and non-toxic so it is safe to use in your scrapbooks.
Some of the my favorite ways to use Stickles are listed below:
Some of the my favorite ways to use Stickles are listed below:
- Stamp a word then Stickles over it
- Use it for the center of a flower instead of a brad
- Accentuate part of a pattern on your patterned paper (i.e. if the paper has flowers you could outline some with Stickles)
- Lightly apply Stickles to your fabric flowers to make them sparkle
- Apply Stickles to your ribbon
- Use Stickles as a glue to glue down a transparent item like Heidi Swapp Ghost Shapes or Tim Holtz Fragments
- Use it to give a little bling to embellishments (i.e. add a little Stickles to a stamped image or sticker to make one little piece "pop")
- Write names on Christmas Stockings!
- Add some Bling to Cricut cutouts
Tips on Working with Stickles:
Clogged tip - use a needle and push it down the opening to clear out the clog
If you are HEAVY on the stickles and you put a TON on a page - let it dry for several hours, maybe even overnight! You can use a heat gun if you are in a rush.
Not sure which color to get - start with a clear one like Icicle or Diamond, these colors will just add sparkle to whatever you are using it with and the color will show through it. Then you can go crazy with all the other colors available!
Examples:

Stickles Titles - Stickle over a stamped word

Stickles for Center of Flowers

Stickles to make an Embellishment "pop"
Need a Stickles fix?! - From April 20, 2009 through April 30, 2009 - buy 5 Stickles and get one FREE! - Use the Comments Section at checkout to state what FREE color you would like.
Wednesday, April 15, 2009
12-Hour Charity Crop
Sweet Memories All Day Charity Crop will be held on Saturday, May 9, 2009 in Wilmington, DE. This crop will benefit the American Cancer Society Relay for Life!
Where: St. Paul's United Methodist Church, 1314 Foulk Rd., Wilmington, DE (next to Brandywine High School)
When: Saturday, May 9, 2009
Time: 9 AM to 9 PM (12 hours of Scrappin!)
Cost: $45 per person
What you get: Breakfast, Lunch, Dinner, Snacks, Drinks, Door Prizes, Raffles, Scrap Time, and CHOCOLATE (can you say Ghirardelli?!) !!
Register by April 22nd (Earth Day) and get a $10 gift certificate to shop at Celestial Creations & Scrapbook Supplies, Inc. plus three (3) extra Raffle Tickets!
Contact Jen at 302-475-0510 or e-mail celestial.creations@verizon.net to get a registration form.
Where: St. Paul's United Methodist Church, 1314 Foulk Rd., Wilmington, DE (next to Brandywine High School)
When: Saturday, May 9, 2009
Time: 9 AM to 9 PM (12 hours of Scrappin!)
Cost: $45 per person
What you get: Breakfast, Lunch, Dinner, Snacks, Drinks, Door Prizes, Raffles, Scrap Time, and CHOCOLATE (can you say Ghirardelli?!) !!
Register by April 22nd (Earth Day) and get a $10 gift certificate to shop at Celestial Creations & Scrapbook Supplies, Inc. plus three (3) extra Raffle Tickets!
Contact Jen at 302-475-0510 or e-mail celestial.creations@verizon.net to get a registration form.
Tuesday, April 14, 2009
How to use Lace Cardstock & Intracacies
Lace Cardstock or Intracacies are essentially a sheet of cardstock that has been cut out to leave behind an intracate, interlocking design. There are so many possibilities for designs that it is almost endless. Midnight Oil Scrapbook Design has designs like dog paws, princess crowns, school bus, baseball, football, pirates, butterflies, Mickey Mouse heads, and so much more!
Here are some examples of ways you can use lace cardstock or Intracacies on a layout:

Birthday cards - I colored the white Flower Lace Cardstock with Glimmer Mist - Pink Ink and cut out the design.

Scrapaholix Page Kit - Same white Flower Lace Cardstock as above, but I didn't color it. I cut out sections and in the top left corner, I accented one flower with pink cardstock. Some of the flowers were placed ontop of the photos...for a change of pace!

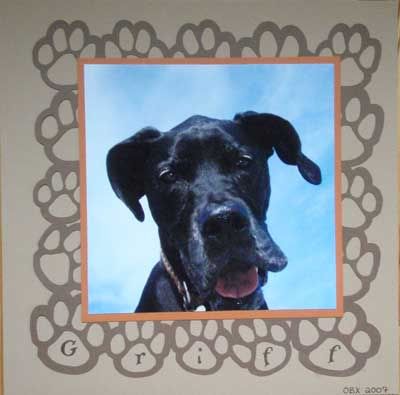
MOSD Paw Print Intracacies Example - Used as a background.
Here are some examples of ways you can use lace cardstock or Intracacies on a layout:
- Background - You can use the Intracacies as a background by gluing it to a sheet of cardstock and creating your layout on top of the design.
- Cut it Apart - Cut out sections of the design to use on your pages. Depending on the design, this might take a little skill making it look even.
- Make it a Mask - You can place the cutout design on a sheet of cardstock and ink, chalk, or glimmer mist over it. Carefully, lift off the Intracacies and the design will be left behind on your cardstock.
- Alter it - You can also use ink, chalk or glimmer mist to change the color of the Intracacies so that it matches your layout. Depending on the design, you may be able to accent a part of the Intracacies by backing a section of it with cardstock. In one of the layouts below, I used some pink cardstock behind one of the white flower Lace Paper to highlight that flower. On MOSD's School Theme Intracacies I think it would be neat to cut out little pictures of the kids and put them in the windows of the school bus.
- Make it a Frame - Use the Intracacies to "frame" your photo. Cut out a portion of the Intracacy so your photo can show through it.
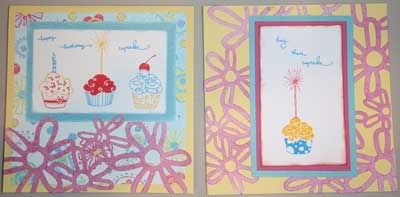
Birthday cards - I colored the white Flower Lace Cardstock with Glimmer Mist - Pink Ink and cut out the design.

Scrapaholix Page Kit - Same white Flower Lace Cardstock as above, but I didn't color it. I cut out sections and in the top left corner, I accented one flower with pink cardstock. Some of the flowers were placed ontop of the photos...for a change of pace!
Subscribe to:
Posts (Atom)


